This was one of the first pictures I took of the upstairs guest bathroom when we first moved in. As you can see, the shower and wainscoting wall tile don't exactly go together (we discovered why later), the sink and toilet are in the wrong place, and not shown in the pic is that the door was hinged on the wrong side. These were the functional things wrong with the room. The cosmetic problems were another issue. The tile in both the shower and floor were un-even, so that each tile was a different height/depth. A smooth marble tile was used on the shower and floor, which got very slick when a layer of water got on it (I almost killed myself a hundred times stepping on the wet floor). The shower/floor tile was just plain ugly, along with ugly brass fixtures. The wood vanity of the sink was in pretty bad shape.
(You can click on most of the photos in this blog post for a larger view).

The plumbing leak happened in February 2009. There were actually two leaks: the shower valves leaked so the shower dripped, and the tub drain began leaking. But when the original owners put up the shower tile after the valves were installed, they didn't cut the holes large enough to be able to change the valve seals. The only solution was to remove the tile. At first I considered doing a temporary fix to get the bathroom back up and working, but there were so many things wrong with the room we decided to fix it once and for all. Here Zac is removing the shower tile and leaky plumbing to start the bathroom destruction.

I usually get the fun job of demolition work. I hacked the walls into smaller pieces, which were then taken out in a few trash can loads.

Part of the poor original construction work was a lack of sealing water out (moisture barriers, caulking, etc). All of the walls were just plain drywall, including the shower walls. Several pieces of drywall that I removed were water damaged and had black mold growing.

Bathroom tub, toilet, and sink removed, drywall pulled down, and floor tile removed. Notice the dark square in the wood floor just to the right of the black shower plumbing. We'll get back to that in a second.

Floor where the sink and toilet used to be. Notice the square hole in the wood floor where the sink was? They had started to put a hole for the toilet waste plumbing. And on the plans, the toilet and sink were in the reverse positions (toilet in the corner), where they should have been. There was even a capped off plumbing stub under the floor. Why was it changed? For the answer, we dig deeper.

This is Zac removing the dark section of wood in the floor. What had happened was that somewhere down the line there was water damage, and a horrible patch job. The patch job didn't remove the damaged wood, either. So based on the evidence in the floor, we think the bathroom was originally tiled in the white tile that was in the master and downstairs bathroom. A major leak occurred, leading to water damage. This forced the original owners to tear out the white tile, patch the wood, then re-tile with the marble on the shower and floor.

Water damage layers removed and the next layer of the subfloor removed. Also note the amount of structure that was hacked out to run the plumbing. Zac reinforced all of this along the way.

This was the transition from old plumbing to new. Zac is cutting out the old plumbing and replacing it with proper plumbing. On the far left side, leaning against the wall you can see the water damaged pieces of wood that were removed from the floor.

New plumbing for the sink installed. The original sink drain stack was 3 inch diameter ABS, which was too large to fit in the wall. The drywall actually bowed out around the pipe. The plumbing was cleaned up and replaced with 2 inch ABS. New copper plumbing was also installed to reverse the sink and toilet positions. The toilet would now be in the corner, while the sink would be next to the door.

Here are the results of the subfloor digging, and the new plumbing. You can see the old toilet waste hole to the right, and the new toilet waste plumbing to the left (with rag stuffed in the pipe). Originally the builders had planned to put the toilet in this position. But the entire upstairs subfloor is held up by structural wood beams that fan out from the center of the house. You can see the structural beams in this picture of the living room, where they are exposed. One of the beams runs right under the bathroom, and right where the toilet waste drain was supposed to be. You can see the side of the structural beam just to the left of the black ABS plumbing. The builders couldn't figure out a way to get around this beam, so instead they flipped the position of the toilet and the sink. When they did that, you could see the back of the toilet and plumbing from the hallway, so their solution was to hinge the door on the wrong side. Our solution: Install an offset closet flange. This allows the plumbing to route around the beam and connect to the downstairs plumbing. In this photo the flange isn't on yet, but you can see the routing of the toilet waste plumbing.
Plumbing complete and subfloor built back up. You can see the offset toilet flange to be installed in the bottom left corner.
Another issue was nailing the boxed floor sections to the structural beam. These sections are connected with 8 inch long nails (original nail shown on top). Zac couldn't find these nails anywhere, so instead he made about 8 of them from bar stock by hot forging the heads, then turning the ends down to a point. One of Zac's fabbed nails is shown below the original nail.

Subflooring complete. To give you an idea of the timeline, this photo was taken September 20, 2009.
New copper plumbing installed for the shower and tub.
New Kohler tub installed. Tub measures 32 inches wide, 60 inches long, and 18 inches deep. Much larger than the original tub.
The proper way to prevent moisture damage is to install a moisture barrier. This step was skipped by the original builders. They had installed tile on top of green board and didn't caulk the seams. So now the proper moisture barrier is installed.
Sink plumbing and wiring above the sink complete. The electrical and switch outlets were moved. One switch outlet was originally behind the door against the door trim. The switches for the fan and lights are now located above the sink, along with an electrical outlet. Those who are playing along at home may notice something different in the sink plumbing from the previous plumbing picture. The sink vanity we had ordered has a structural wood backing beam. So when we dry fitted the fixtures it was discovered that the plumbing for the sink connections had to move down a few inches. At this point it was an easy fix. Always a good idea to dry fit everything! I also thought it was funny that the plumbing book lying in the hallway made it into this pic.
New drywall going up. You can see the new drywall against the only original wall we did not tear down, which had the horrible lighthouse stencil. The square hole framed in the drywall above the sink was for the addition of an inset medicine cabinet/mirror combo. 
Drywall textured with hock & trowel to match the rest of the texture that will be throughout the house. Timeline check: Photo taken August 29, 2010.

1/2 inch thick Hardiebacker board installed over the moisture barrier in the shower on the walls.
1/4 inch thick Hardiebacker installed in thinset on the wood of the floor, then thinset spread over the Hardiebacker to prep for tile. Here the walls are painted with Behr "Wheat Toast" paint in a satin finish.
Hardiebacker wall seams mudded and prepped for tile. The floor tile is beginning to be installed. This was porcelin tile purchased from Lowes. The large tiles are 8 inch, with 4 inch smaller tiles set in a pinwheel pattern.
Floor tile complete, ready for grout. The grout color sample card is on the floor with the wall tiles leaning against the wall. I chose all colors, tile patterns, fixtures, and decor for this room. All paint, tile, and decor was puchased at a different time and spanned several months, so I had to visualize how everything was going to go together.
Sink set and 4 inch porcelin tiles set for the wainscoting. Wall tiles were also purchased from Lowes. I wanted a brick pattern with decorative flower tiles randomly spread throughout to avoid the "railroad track" parallel line look of grout lines.
Zac installing the tile on the front of the tub. I chose a pre-fabbed stone medallion as the focal point for the front of the tub, and another for the center of the shower. The medallion was centered in the tub face first, and all tile was referenced off of that point.
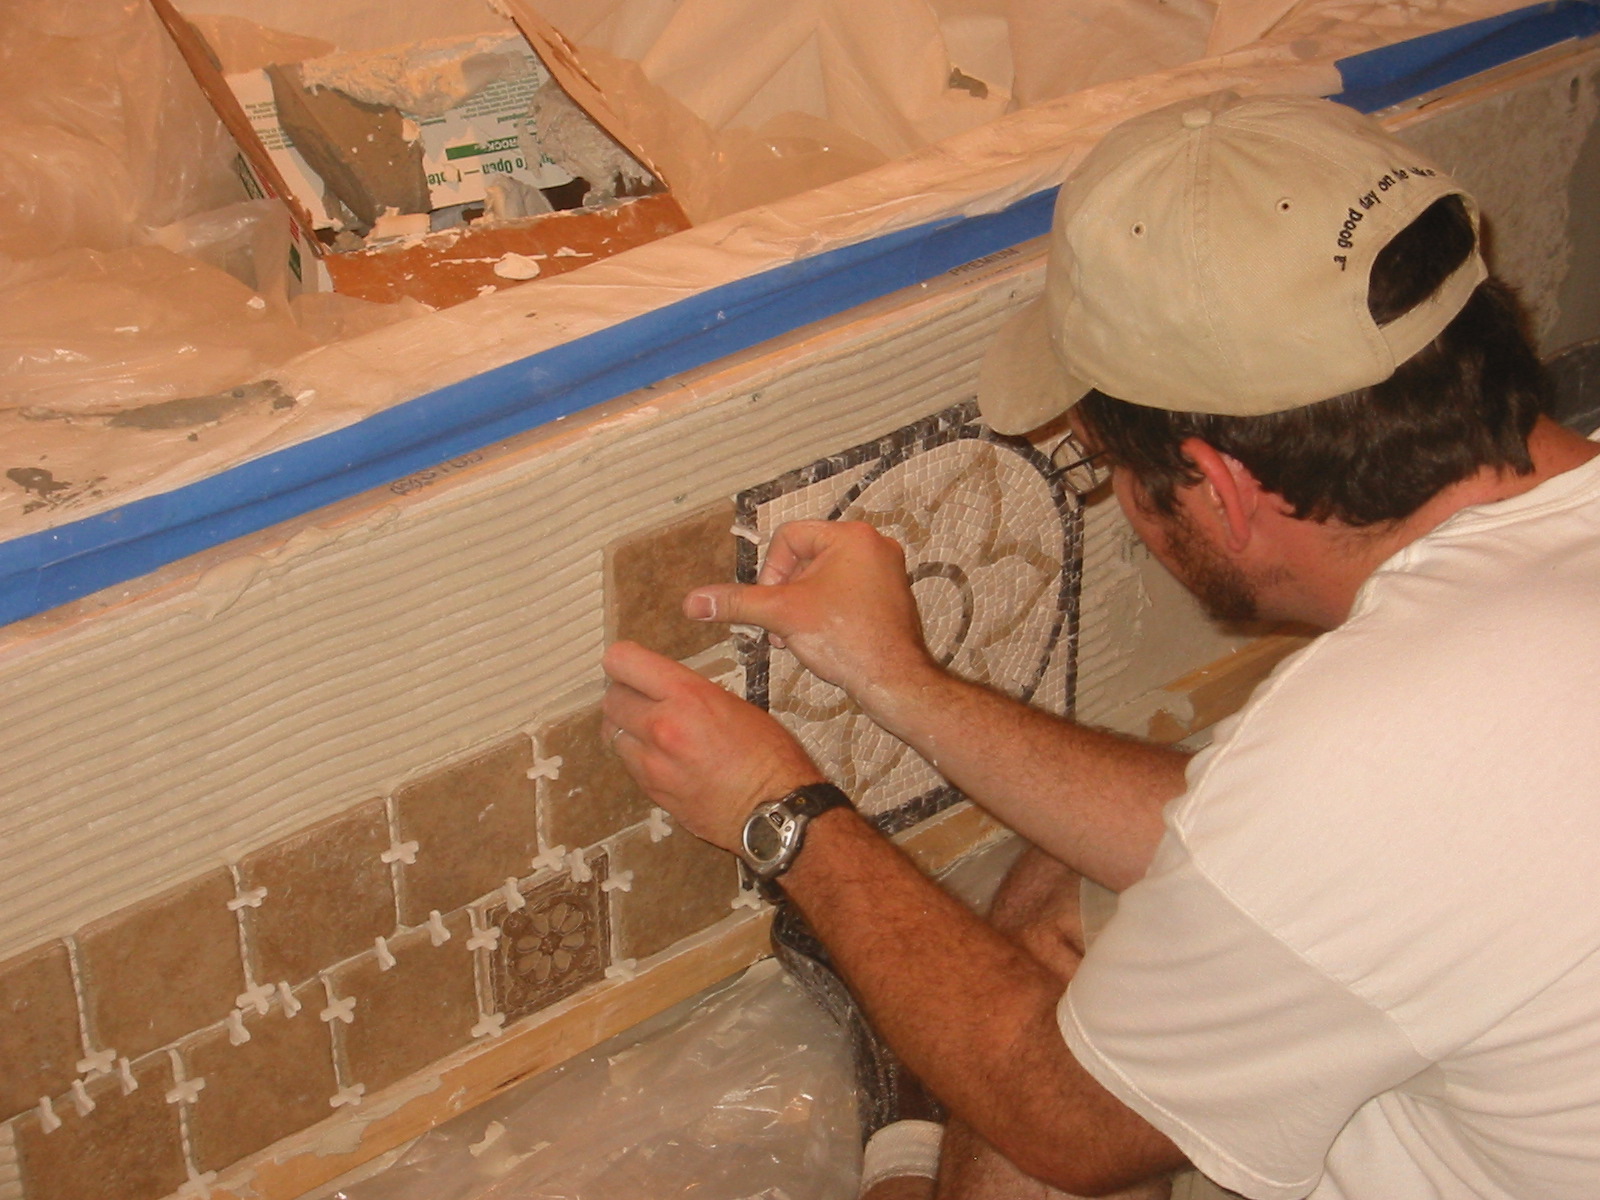
Shower and tub tile complete, with the two medallions. The blank spots in the corners were for the stone shower shelves, which were installed next.
Tile pattern wrapping around into the wainscoting. A chair rail caps the top of the wainscoting, and the same stone chair rail was used to dress the top edge of the tub, and as crown moulding along the ceiling. Time check: Photo taken October 9, 2010.
Before I unveil the Before & After pictures, here's a list of all work done on this bathroom. All of the work we did ourselves including design, fabrication, and installation.
Plumbing
- Moved sink & toilet drains
- Re-routed vents
- Replaced/rerouted all supply lines and replace damaged pipes
- Installed new tub waste
Electrical
- Removed original light and fan
- Installed new shower light/fan combo
- Installed pendant lights above sink
- Moved light switch
- Moved outlet
Structural
- Replaced subfloor
- Repaired water damage under tub
- Reinforced boxed floor sections
- Added wall studs
- Framed tub wall
- Framed medicine cabinet
- Installed new entry door
- Installed moisture barrier in shower
- Installed Hardiebacker and drywall
- Textured walls
Cosmetic
- New tile in shower, on walls, and on floor
- New paint
- New sink, toilet, and tub
- New fixture hardware in brushed nickel
- New shower door with brushed nickel frame and crackeld pattern etched glass
- Pendant lights above sink with brushed nickel
- Brushed nickel towel bars
- New storage cabinet installed
And now for the Before & After photos! I did my best to try to match the camera angles from 2 years ago. Final time check: All "after" photos taken December 21, 2010.
Entry into the bathroom before. Note door hinged on wrong side.
Entry into the bathroom after.
Sink and toilet before.
Sink and toilet after.
Bathroom mirror before.
Bathroom mirror after.
Shower before (sorry I didn't have a photo before the leak).
Shower after.
Back wall of the shower before.
Back wall of the shower after.
Entry door before.
Entry door after. This is the first of the new doors to be hung. All of the interior doors will look like this. I fell in love with the circle design in the middle for the Round House and had to have it.
Wall switches before.
Wall switches after.
Tub before.
Tub after.
Ceiling and trim before.
Ceiling and trim after. The light above the shower also has a fan in it.
Shower tile before. I hated this tile because it had an image of the Crypt Keeper from Tales of the Crypt in the marble. Do you see him?
How about now? There he is!
Ok, if you can't see him I'll spell it out. Clockwise from top the pic is labeled "Bald head, a few teeth, neck & shoulder, stringy hair, eye." We actually saved this tile so that we can cut the Crypt Keeper out of it and keep him. However, he will NOT be hung on any of the walls in the house!
Shower tile after. No more Crypt Keeper looking at you as you shower!
Wainscoting tile before. People often say of my "before" pics that the house "doesn't look that bad." That's because the horrible craftmanship doesn't show up well in pictures. Here's where I tried to show the crooked tile. The bottom tile, third from left isn't popping out. It was set in like that!
Wainscoting tile after.
And here are a few pictures just to give a general tour of the bathroom.

Close-up of the shower door glass with the shower medallion and tile in the background.
View while standing in the shower.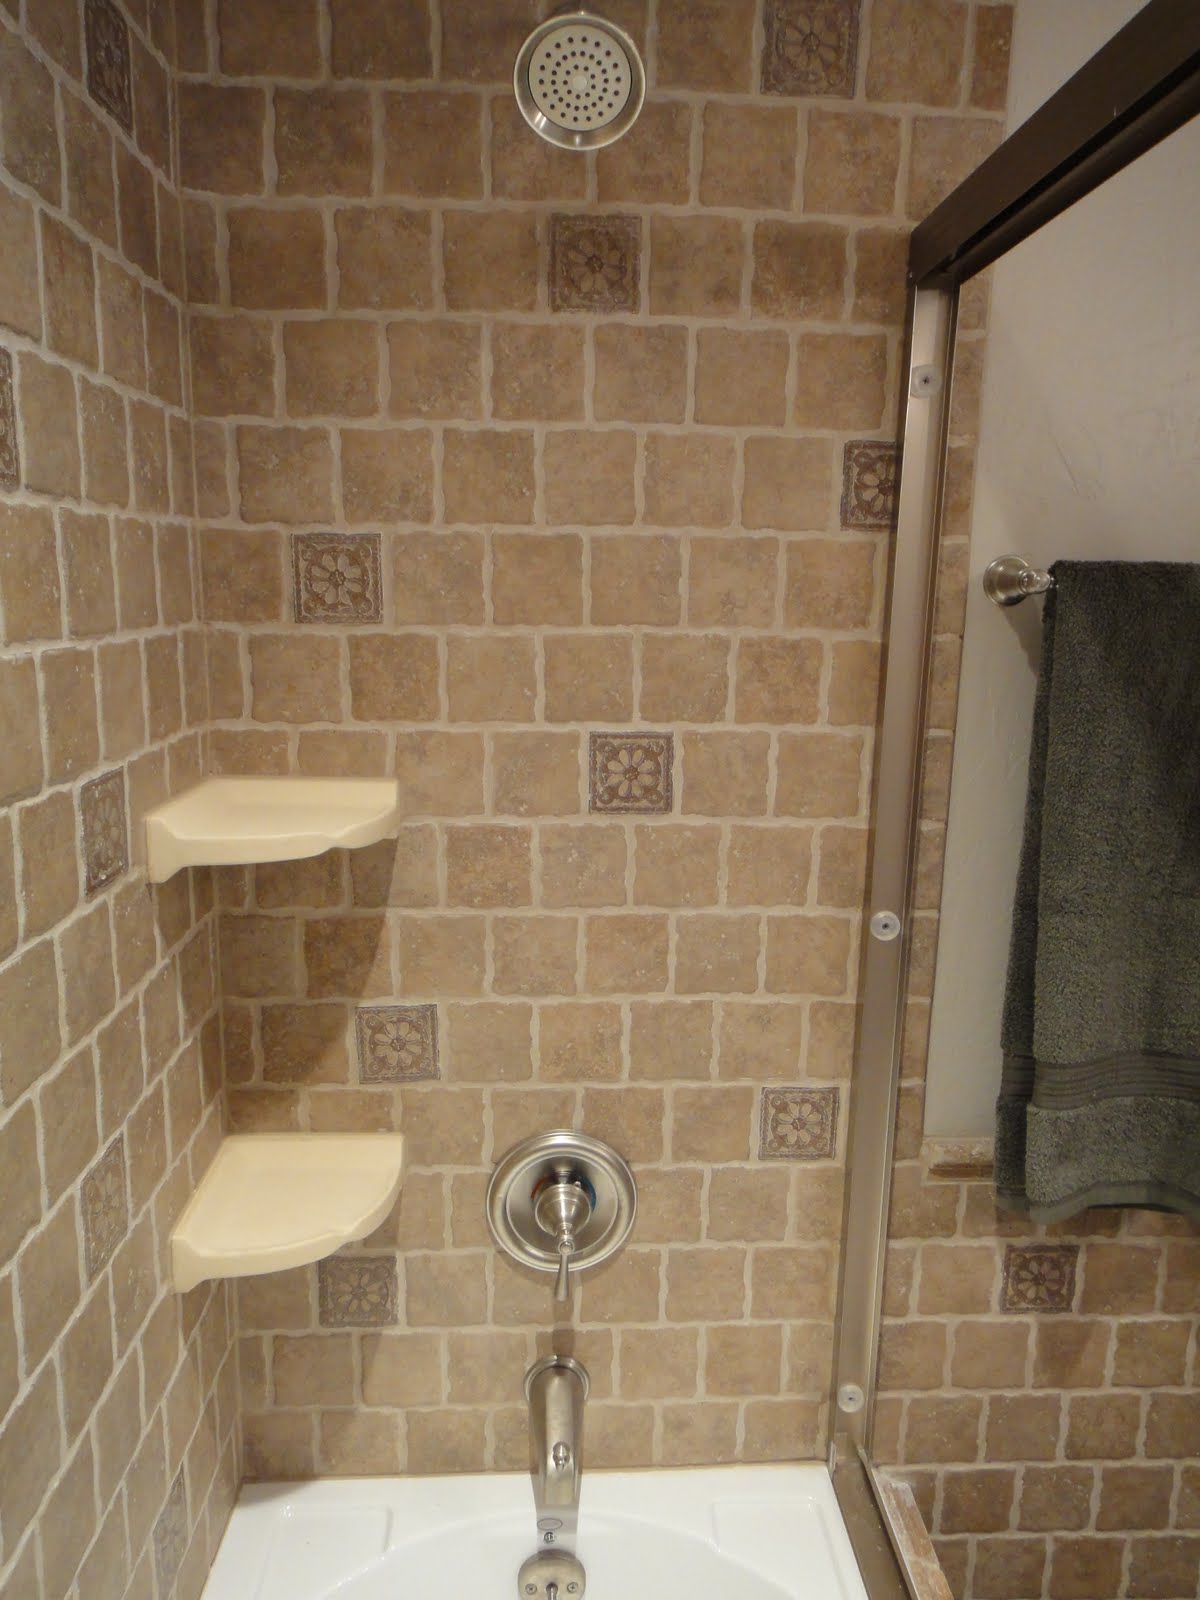 So that's it! Two years to go from a hideous bathroom that leaked and had water damage to one that (I feel) is pretty and we know we've done everything possible to seal out water. The only bathroom left to rennovate is the Master bath. But we are taking a break for awhile and moving on to rooms that don't have any plumbing.

